Since its first release in 2014, Kubernetes quickly became the new standard for deploying and managing software in the cloud. As a beginner, it is difficult to learn how to work with Kubernetes, let alone know and understand the security features Kubernetes has to offer. Kubernetes was designed with functionality in mind, not security, so there are no “quick solutions” or magic toggles to “add security” to your cluster.
In this blog post, we provide a high-level overview of three security capabilities in Kubernetes:
- Role-based access control (RBAC): The permissions system of Kubernetes
- Security context settings: Options for container security in Kubernetes
- Network policies: The built-in firewall of Kubernetes
When these three security capabilities are implemented correctly, they improve container cluster security.
Role-based Access Control
RBAC is a general term for a system that defines who can access what based on their specific identities. In Kubernetes, it’s a little more complicated. As an administrator you can control who (subject) can do which action (verb) on what thing (resource). Let’s dive in a little and explain some terminology:
Subject: Kubernetes uses a few objects to represent an entity:
- User – a human performing actions through an API server
- Group – a logical object that groups multiple subjects
- Service account – a non-human entity (a container, pod, node, etc.) performing actions
Verb: A verb is used to specify a subject’s action: can it read something from the API server? Can it set something in the cluster? Can it impersonate a different subject and perform an action on its behalf? Etc.
Resource: An entity that can be governed by Kubernetes – it can be pods, controllers, logs, and in some cases even subjects can be resources.
Role: A way to define verbs (actions) on resources. You can bind different subjects to a role and all of them (subjects) will have the same permissions settings. Roles can be scoped to a namespace or a cluster. So, a ClusterRole applies it’s settings on objects on the entire cluster, while a regular role is limited to resources that are in the specified namespace.
Now, let’s see how these terms come together. Imagine we are operating a Kubernetes environment for a car dealer with an online store. In the cluster we have three namespaces: one for Research & Development (R&D), one for QA, and one for our online store. The R&D employees are only allowed to make changes in the R&D environment. QA is only allowed to make changes in the QA environment, and the cluster administrators (us) are allowed to make changes in all namespaces.
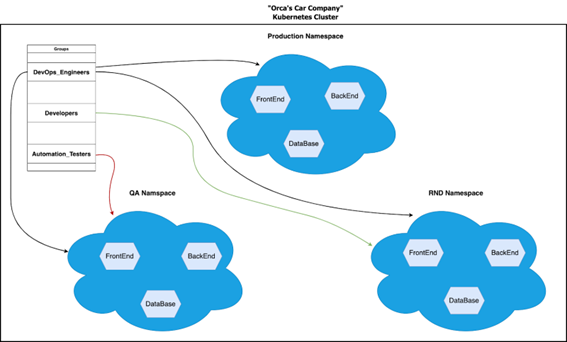
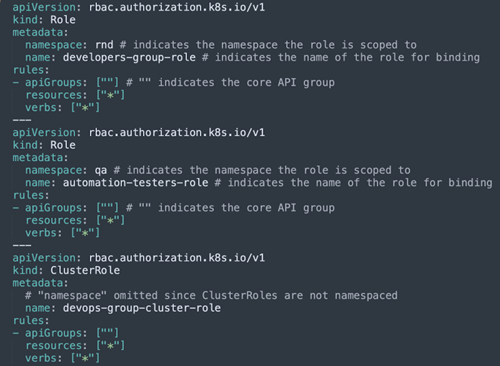
Each employee has a user in the cluster that is part of their department group (developer in R&D group, automation testers in QA group, etc.). We can define three roles:
- Group R&D can do everything (*) in all resources (*) scoped to the R&D namespace.
- Group QA can do everything (*) in all the resources (*) scoped to the QA namespace.
- The last role is ours, the cluster administrators. For it, we need to create a ClusterRole instead of a regular role because we need to be allowed to make changes across the entire cluster, not just a single namespace.
The roles definitions look like this:
Now we need to bind our role to the correct users. By binding a subject to a role, you are effectively instructing Kubernetes to link the subject to the permissions in the role, so that the subjects get the desired permissions. In our case, it looks like this:
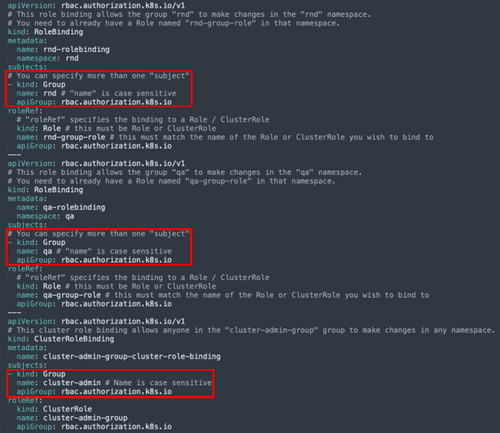
Now with every new employee of our company, we can add them to their designated group, and they will automatically get the permissions they need.
Security Context
RBAC is the permissions system between entities and Kubernetes, but what about containers and their hosts? That’s where the security context settings come into play. The security context defines privilege and access control settings for a pod or container to its host (node). It means we can have more granular control over what the pod or its containers can do. We will elaborate on three settings offered by the security context setting (there are many more):
- Linux capabilities: Linux capabilities are unique attributes in the Linux kernel that grant processes and binary executables specific privileges generally reserved for processes whose effective user ID is 0 (Only the root user has UID 0).
- Privileged or unprivileged: Privileged mode grants a container root capabilities to all devices on the host system. Running a container in privileged mode gives it the capabilities of its host machine.
- AllowPrivilegeEscalation: A container running with the allowPrivilegeEscalation flag set to true may have processes that can gain more privileges than their parent process. For example, if an attacker gains a foothold in an Ubuntu container running as www-data, they can quickly escalate their privileges if the allowPrivilegeEscalation flag is set to true. The option exists (and is defaulted to true) to permit setuid binaries to run.
Network policies
Container networking is simply a regular network that has been virtualized by the Linux kernel. In Kubernetes, it’s a bit more complicated because containers are regularly moving from host to host, so the system needs to be aware of where each container is located and migrate its networking settings and configurations with it. The different components in the Kubernetes platform (Pods, containers, nodes, applications) use other networking methods to communicate. This includes container-to-container communication, Pod-to-Pod communication, Pod-to-service communication, and external-to-service communication. We will focus on Pod-to-Pod communication. Let’s use the car dealer application as an example.
The production environment consists of three Pods:
- Frontend: Is responsible for the website and UI and contains one Nginx image. If a customer wants to buy a car, they will be directed to this frontend..
- Database: Responsible for orders and catalog storage and contains one container of Postgres image. It holds the catalog and inventory of cars in the store.
- Backend: Queries the database on behalf of the frontend Pod and contains one container of Ubuntu Python images. It receives orders from customers from the frontend and updates the inventory and catalog.
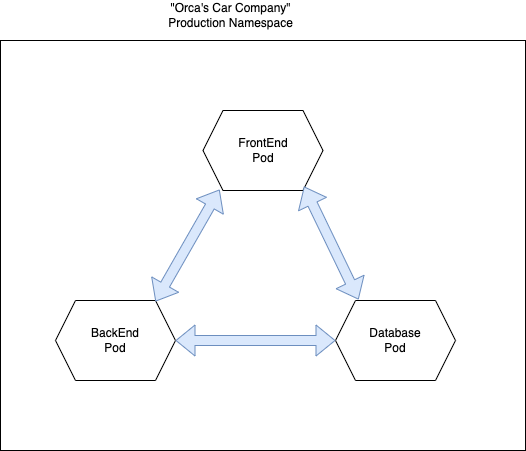
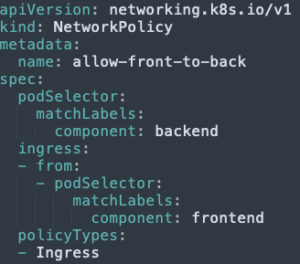
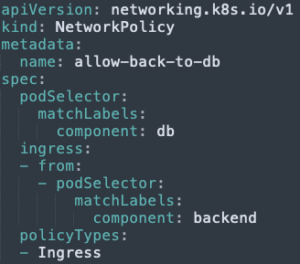
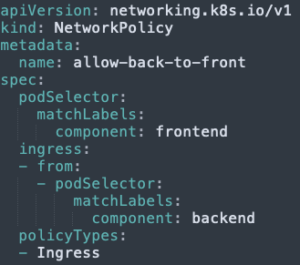
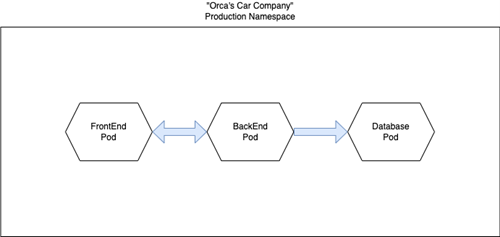
By default, in Kubernetes, all Pods in the same namespace can communicate with each other, but that is not what we want for our cluster. We want the frontend to be able to talk to the backend, the database to the backend, and the backend to both the frontend and database Pods.That’s where network policies can come to the rescue. Network policies are Kubernetes resources that control the traffic between pods. They use the Pod’s labels to select Pods and specify the traffic directed toward those Pods using simple rules. It’s best practice to start with a “deny ingress” network policy and allow specific communication channels whenever a new requirement rises, so let’s start with that:
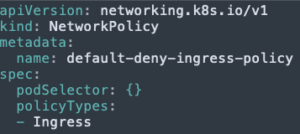
Under the “metadata” field, we have the “name” field. Under the “spec” field, we have two other fields:
- podSelector: Selects a group of Pods using a LabelSelector. If empty, it would choose all the Pods in the namespace (Dangerous!).
- policyTypes: Lists the type of rules that the network policy includes. The value can be Ingress, Egress, or both.
Now let’s add our three allowing policies:
- Allow the backend Pod to receive from the frontend Pod:
- Allow the database Pod to receive from the backend Pod:
- Allow the frontend Pod to receive from the backend Pod:
Each component can communicate with the components it is designed to but can’t communicate with the other components: Success!
These policies can be a lot more restrictive by adding specific ports allowed, etc. Be sure to learn more about this if you plan to utilize network policies.
Kubernetes security is a vast subject with a steep learning curve. We wrote briefly on our three picks for security components you can use to secure your cluster and workloads. We encourage you to keep reading on more ways to secure Kubernetes.
Artigo traduzido e disponibilizado pela DigitalSkills Consulting - Distribuidora oficial de soluções de cibersegurança do fabricante Orca Security. Para mais informações: www.digitalskills.pt | [email protected] | 21 418 05 21
Artigo original no site do fabricante em https://orca.security/resources/blog/kubernetes-security-capabilities-policies/
